Having gone through getting photos, I now get to a critical point in the process of real estate photography.
I edit real estate photos in Lightroom using a well refined and defined workflow which is this
- Import the photos into Lightroom
- Apply import presets to all photos
- Create backups of the files
- Organise the photos in the Lightroom Catalogue
- Put the photos into stacks
- Choose the photos to edit
- Edit the photos – transform/ crop
- Edit the photos – basic panel
- Edit the photos – removing stuff
- Edit the photos – finishing touches
- Apply metadata to the edited images
- Export the photos out of Lightroom
- Issue the photos
- Sort out the digital files
OK – this is my workflow, which I follow on every shoot. Now it might look like a lot to do but I used to do lots more, this is the most efficient workflow that I have come up with after years.
Who am I?
I am Rick McEvoy, ABIPP (Associate of the British Institute of Professional Photography). I specialise in architectural, construction and real estate photography. I am also a Chartered Builder (MCIOB).
And I have been using Lightroom since version 1 appeared back in the day.
So I know about this stuff ok?
And I explain things in plain English without the irrelevant detail.
What is a workflow?
Well I wrote about this in the post Real Estate Photography Workflows – Why These Are So Important. But basically a workflow consists of steps to get something done.
That is it – a series of steps to get something done.
Is this really how I process my real estate photos?
Yes it is. I have been doing this for years, and spent too much time processing images when I just needed to focus and do what is needed and no more.
I actually use this workflow for all my images. This is the most efficient I can get. And using this workflow I get consistently high quality images time after time, with my own look thrown in which is nice!
This is the workflow that I used to create the images that I submitted to the BIPP for my Associate portfolio review, which was successful and earned me the letters ABIPP!
This is what I do
I am explaining how I work, and the settings that I use. There are so, so many variables in Lightroom that I cannot possibly go into here. I could write a post about each panel to be honest, but here I am going to stick to telling you what I do.
Have a play around in Lightroom
Don’t forget, all of these things are what is called non-destructive editing. They can all be undone. Only once you have exported an image out of Lightroom are things fixed.
Well not really, as the image in Lightroom is still there and you can still do unlimited changes to, including going back to the very beginning.
No the file that you export from Lightroom is fixed, but that is all.
So you can play around with the sliders to your hearts content, which is a great way of seeing what they do.
OK – shall we have a look at these one by one?
1 Import the photos into Lightroom
I insert the SD memory card into the dedicated slot in my PC. Lightroom knows what to do. I have selected New Photos, so only new photos are imported.
This is what this all looks like.
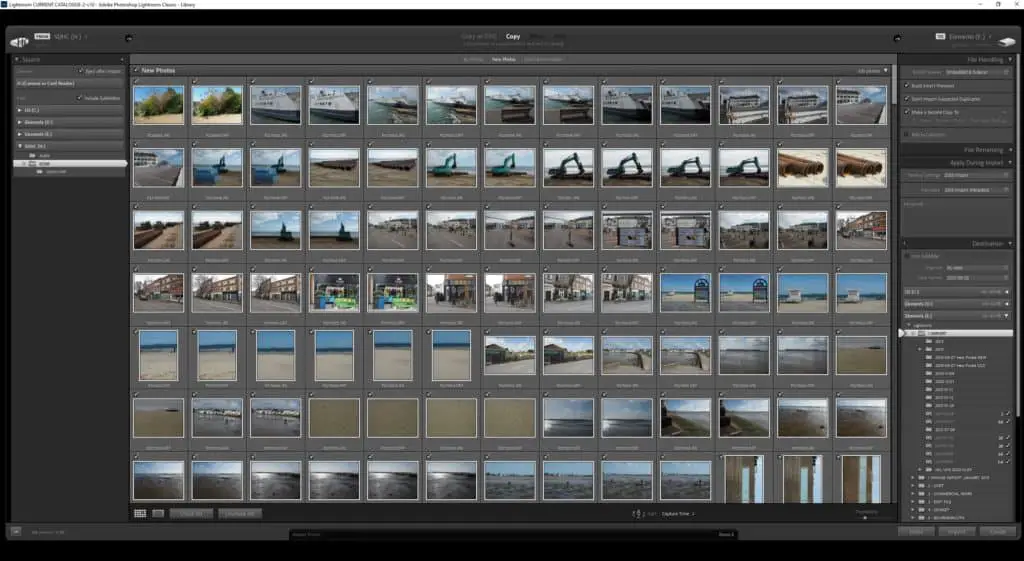
1 Whole screen
Blimey – let’s have a look at some sections that are of interest. The whole screen does look rather daunting but it is not too bad honest.
On the left you choose where the photos are imported into Lightroom from, which in my case is from a memory card. Well it always is to be honest.
2 Import options
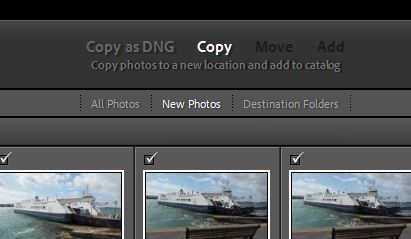
I just select copy, and the New Photos option below. This means that the photos stay on the memory card just in case there is a problem with the import. Which there never is to be fair but better safe than sorry.
The New Photos option makes sure that if there are any photos that I have already imported into Lightroom on a memory card these are not imported again.
There shouldn’t be any but again let’s keep things nice and simple and in order.
3 More import settings
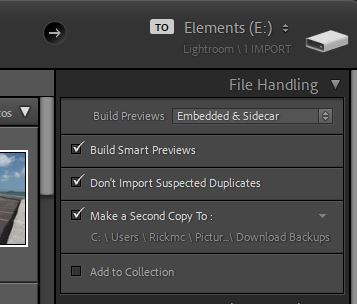
This is where the photos are going to, and how.
Build Previews – Embedded and sidecar. It is so long since I chose this setting that I cannot remember why. But I stick with it….
Build Smart Previews – I do this so Lightroom builds previews which load much quicker and save time.
Don’t import suspected duplicates – well I don’t want to so I ask Lightroom to check for this.
Make a second copy to – I will come back to that below.
Add to collection – I don’t do this now. I do this later. There is a reason for this. Bear with.
4 Apply during import
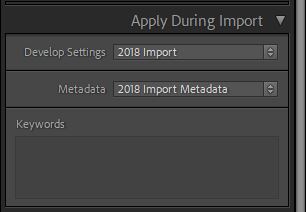
Lovely import presets. Things that I do to all my photos, that I get Lightroom to do on import. By doing this I can end up with photos which are on their way to being finished right after import which is a wonderful thing.
5 Where to put the photos
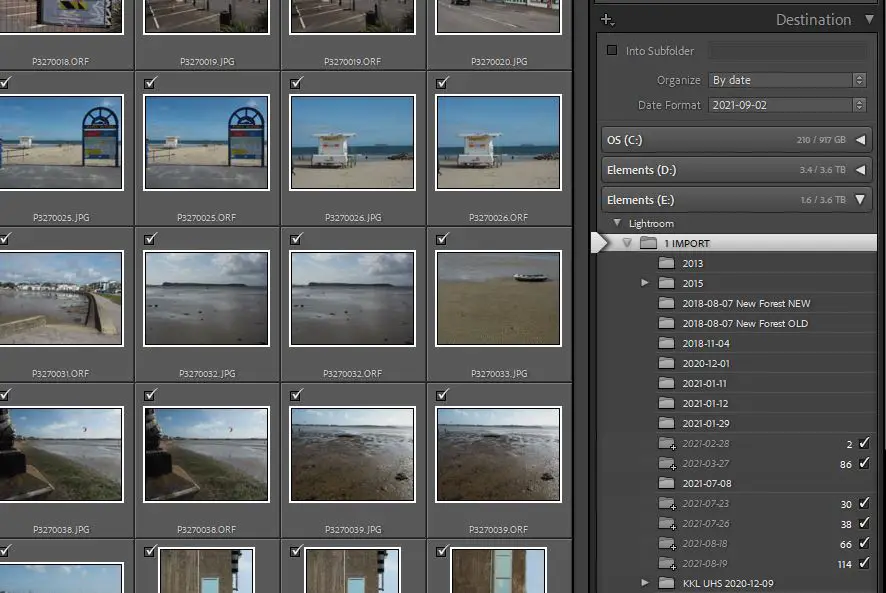
I get Lightroom to sort the photos into folders by date – this just works for me. And I don’t bother with sub-folders.
As you can see there are photos taken on a number of dates, as these are personal photos that I took along with one shoot.
2 Apply import presets to all photos
Why do I do this? Well it turns out that there were things that I was doing to every photo, manually and individually. Lightroom has some incredible automation built in, such as develop presets.
I have created my own presets, one of which I apply when I import every photo.
Does this slow down the import?
Sure it does, but I know that and I am fine with that. I am asking Lightroom to do a lot, and accept that this will take time.
So do you know what I do when I start off an import run? I go off and do something else like sort my gear for the next shoot. Or have a beer….. I know that the import will take some time so I leave Lightroom to it.
Here are the import presets
1 The basic panel
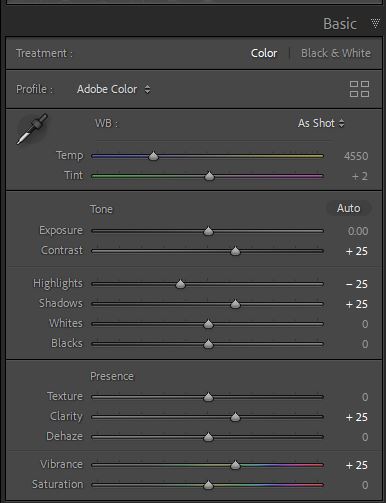
Things that I use to do to every photo that Lightroom does on import. Nice!
2 Detail panel
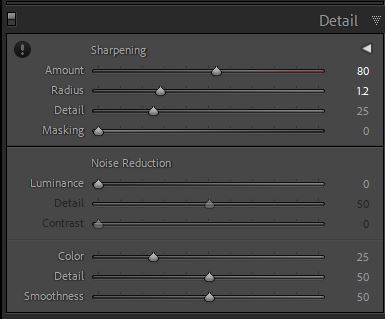
I am using the same camera and lens, and the detail adjustments are the same for every shoot, so I get this out of the way on import.
3 Lens Corrections
I have selected my go to lens here, the Canon 17-40mm F L lens, and Lightroom cleverly makes the corrections required by the optics.

4 Effects
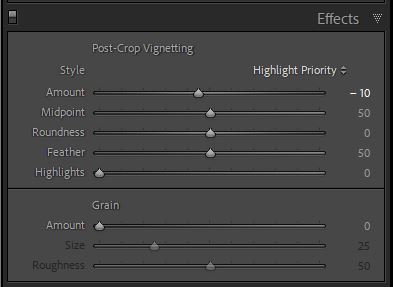
I add a vignette to every photo. What is one of these? Well if you play around with the sliders you will see for yourself, but basically I am darkening the corners and edges to make the middle stand out more.
3 Create backups of the files
Another bit of automated Lightroom loveliness which I showed you on the import section. I need to tell you where things are on my set up.
- Lightroom is on my PC hard drive.
- The Lightroom Catalogue is on an external hard drive.
- My photos are all on an external hard drive.
So when I import images a duplicate set is added to my computer hard drive, meaning the images are already in three places, including on the memory card.
And I have an automated cloud backup running in the background all the time.
Before I delete the photos from a memory card they are added to another external hard drive stored off site.
This is how I look after my images.
4 Organise the photos in the Lightroom Catalogue
OK so we have the photos in Lightroom. Now for the good stuff. I have a very simple file structure. This is it. Just 10 main folders.
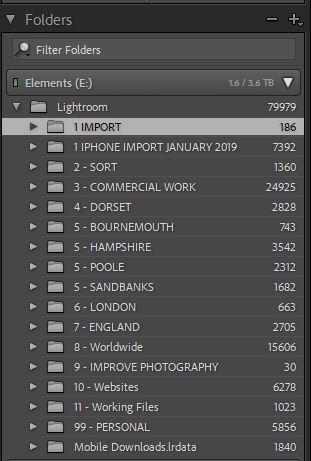
Each folder is sub-divided by year, and then job name.
I create a folder with the job name, and then a sub-folder titled all. I will do a quick cull of images but more on that in a moment.
6 Put the photos into stacks
I shoot HDR, meaning that there are three photos of each shot. I merge them together using the HDR Merge tool in Lightroom. One for another post but the point is that the first of each set of three images is on top of a stack so I can see just that one image.
7 Choose the photos to edit
I go through the photos one by one, using P for pick and X for reject. Once I am happy with the image set I create a folder called Picks and move them to that folder. And I add this folder to a collection so I can see them on my iPad/ iPhone.
Now I have the images that I want to edit in one place separate from everything else.
All nice, simple, straightforward and helps me work more efficiently.
8 – Edit the photos – transform/ crop
I crop the first image, and then go to the transform panel, where I check that the verticals are vertical and the horizontals are horizontal.
This is a visual thing that I cannot explain in a blog post to be honest, but I can tell you this.
Crop first.
Next get the horizontals correct.
Only then do you do the verticals. Don’t do these first or you will end up in trouble.
And this is the unusual bit
I then move on to the next photo and do the same.
Yes I do these adjustments to every photo before moving on to the next panel.
Why do I work this way?
I get more consistent results doing this, and I want to start off with the crop and transform so I am spending my time on the final composition.
9 – Edit the photos – basic panel
The beauty of Lightroom is that you work through the panels in a logical order. The Basic Panel is far from that, it is the main editing panel for me.
Working through the panel features;
Treatment
Colour or black and white – is what it is.
Profile
I use Adobe Colour – click on this and see what the other profiles look like.
WB – White Balance.
There are two ways of getting the right white balance, which is an importing starting point as this defines the colours going forwards.
Eye dropper tool – click on this (under the word profile), then move the eye dropper to something neutral – grey is ideal. You will get a box appear with the text “Pick a target neutral”. Move this around until you find something where the three numbers are the same and click on it.
When I say the numbers are the same I mean within 2 or 3 is fine.
The other way is to select a white balance preset. If you do the above then the word changes to custom. Click on that and the white balance presets appear.
And the beauty of this is that you can copy and paste the white balance to every other image where the light was the same.
The wonderful Auto button
Next is a button to the right of Tone called Auto. Go on, try it, it very often gives me something close, and show what is possible.
You can use auto and then tweak this if you want, but give it a go – there is nothing to lose and you can always go back to it.
Exposure.
This is the exposure obviously! Try one thing here – slide the exposure to +2, and then to -2. These are the three exposures that I get with HDR – you have just recreated what they look like in Lightroom!
Shadows and highlights
Visual adjustments, but if you hold down the shift key and double click on the bit in the middle Lightroom will try to set these for you.
Whites and blacks – same as above.
Texture
I use this to bring out textures on exterior photos but not interior photos.
Clarity
Now this is an interesting one – I start at 25 the move to the right and see what happens. This is actually increasing the mid tone contrast and sharpness – I tend to stick within 15-35 myself but have a play.
Dehaze
Play with it. It removes haze in a scene. And go all the way to the ends to see what it does, which is quite funky.
I only use this if it was very hazy on s hoot, and for landscape stuff, not so much for real estate photography.
Vibrance
My favourite slider. Subtle, the vibrance slider increases the intensity of the less obvious colours in a photo. Skin tones are protected.
I start with 15 and on the first image and slide left and right and pick what works for me, which I use for the rest of the photos.
Saturation
I do not use this – it is too clumsy.
And let’s save a whole heap of time
Once I have done the first photo, if the rest are similar I can add the adjustments to all the other photos.
I can do this by copying the adjustments on the first photo and pasting them to the next, and the next.
The other way is too select the photo that has the settings that you want to apply to the other images, then select all the images (in the film strip at the bottom using Control A), and hit Sync.
Magical ways of getting things done quickly.
I do this for a set of interiors, and then edit the first exterior photo and do the same again.
Yes this really can work.
Tone Curve Panel
I tend not to use this
HSL/ Colour Panel
Whilst I love this panel I do not use it for real estate photography work. I use it more for travel and landscape work, and higher end architectural photography.
One for another time – this post is after all about how I process real estate photographs.
Detail panel
This is already set on import. I do check though and move the Amount slider just to check with the first image.
Lens Corrections
Already done on import.
Transform
I have already done this, but want to say a few things about this panel.
Try Auto, it might just work.
Guided is very precise – you place vertical lines and let Lightroom apply them to the photo.
Level and vertical are what they say they are.
Full – again try this.
But what do I do?
I tend to only refine level and vertical, to + or – 5. And here is another top tip.
Click on the blob in the middle of the slider, and rather than dragging it hit the right arrow key, and you get +5. Left and you get -5. This is how I do my transform adjustments.
10 – Edit the photos – removing stuff
At the top there is the spot removal tool – it is the circle with an arrow to the right of the crop tool. Hit that, and then Visualise Spots at the bottom, and you can get rid of dust spots caused by dust on the sensor.
And if there is anything that I want to remove that is bigger than a dust spot I do this in Photoshop. And this is all I use photoshop for.
And now let’
11 – Edit the photos – finishing touches
OK – here is another top tip. To the right of the Spot Removal tool is the Radial Filter. I use this to highlight the façade of a building, making it a little bit lighter.
This is my secret finishing touch.
It is hard to explain in writing, but I will have a go.
Select the tool, and drag a shape roughly over the building.
Select Dodge to lighten, and then rather oddly you have to choose Invert to make the adjustment inside the shape rather than outside. It is the red bit that you want on the inside.
Another subtle adjustment that makes an image pop just a little bit more.
12 – Apply metadata to the edited images
Only now do I add metadata, a few keywords, and rename the file to suit the shoot, like this.
Building X Shoot, 31122000 001.
The last number is a sequence of numbers that you can add when renaming a file.
13 – Export the photos out of Lightroom
Again lots more variable – these are my 75% compressed 1 MB JPEG settings – use these and you will be fine (I notice that the maximum file size is 2000 (2 MB) and not 1000 (1MB). I must have had to change this to as Lightroom couldn’t compress the file down to 1MB.
This is a preset that I have created.
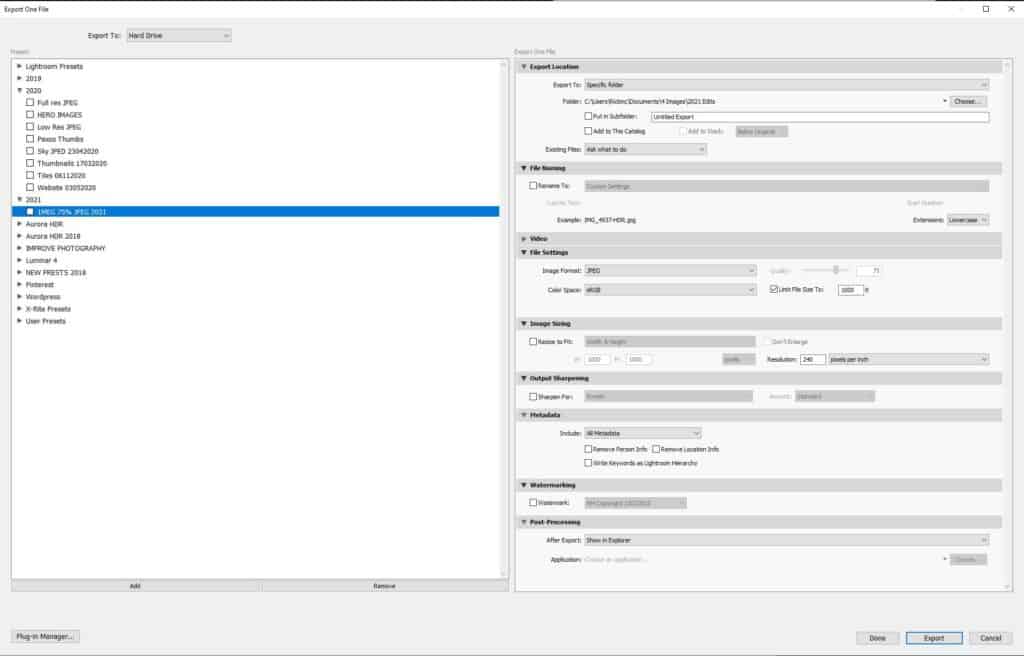
When I export the photos new JPEG files are created.
14 – Issue the photos
A happy time. I love doing this.
15 – Sort out the digital files
Well to be honest this is already done with my filing system.
Other things that I might do
Change the sky
I do this using Luminar – one for another time,
OK – I am done – just one more thing to mention here.
My Affiliate links – Lightroom
If you want to get Lightroom and help me please click on this affiliate link. I get a commission and Adobe get a little bit less. And you get my gratitude.
My Luminar Affiliate Link.
And if you want to get Luminar and help me please click on this affiliate link. I get a commission and Skylum get a little bit less. And if you enter the code MCEVOY at checkout you will get $10 off, which is nice.
Related reading
If you want to know more about real estate photography check out my real estate photography page.
If you want to know more about me, and for everything else just head over to my Start Here page.
And to watch the video about this blog post head over to my You Tube Channel here.
Photography Explained Podcast
Yes I have my own podcast, the Photography Explained Podcast, which is very good, even if I do say so myself!
That’s all for this week
Please, any questions get in touch via my website. Cheers from me Rick