Yes, back to what I love to do the most. Take photos at major construction sites. This live construction site is at University Hospital Southampton.
This photo was taken using the following equipment and camera settings
- Canon 6D
- Canon 17-40mm lens
- Focal length – 17mm
- RAW image capture
- Auto-bracketing
- Shutter speeds – 1/320th second, 1/1600th second, 1/4000th second
- Aperture F8
- AV Mode
- Handheld
- Processing in Lightroom
That was the basic camera settings. I will elaborate on these, and finish off by telling how I got the shot – yes the actual picture taking bit, not the tech bit.
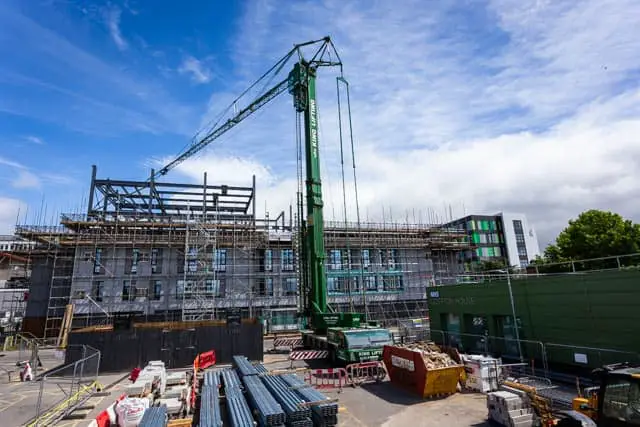
Here is the photo.

Camera used for this photo – Canon 6D
Yes, I am still using the good old Canon 6D. Still a great camera, still giving me great results. The Canon 6D is a full fame camera. Technically excellent, but no frills to be honest. Which is just how I want my camera to be.
It takes great photos for me every time, and has been doing so for many, many years.
If you want to know more about the Canon 6D check out this excellent blog post, Is The Canon 6D Still Worth Buying in 2022?
My camera lens for construction photography – Canon 17-40mm lens
The Canon 17-40mm lens is an excellent lens for construction photography. It gives me the focal length range that I need, although to be fair for this photo a bit wider would have helped, such is the scale of this construction project.
This lens is technically excellent, capturing high quality photos, and has minimal lens errors. I have been using this lens with my canon 6D for years.
Focal length 17mm
Yep, the full 17mm was needed for this photo. And I would have appreciated it being a bit wider. I couldn’t get back any further so had to lose some of the composition when I corrected the verticals.
The beauty of the Canon 6D is that it is a full frame camera, so I get the full 17mm, there is no crop factor applied like there is with cropped sensor and micro four thirds cameras.
RAW image capture – not JPEG
No I shoot in RAW so I can adjust everything myself after. You can see the RAW images below. They look rubbish straight out of camera but they give me lots of data to work with.
Why I use auto-bracketing to take photos of buildings?
I take three photos, using the following shutter speeds – Shutter speeds
- 1/1600th second
- 1/4000th second
- 1/320th second
Here are the three RAW photos

As you can see, I have the correct exposure, and then one photo underexposed by 2 stops, the dark photo, and one photo overexposed by 2 stops, the light photo.
And the verticals need some attention!
I merge these all together in Lightroom, creating a new image that I work from. It might sound complicated but it is not when you get used to it.
What this gives is more data in the lights and the darks, which I need for my construction photography.
My go to aperture – F8
I tend to use F8 most of the time. It gives me the depth of field that I need, and is the sweet spot in terms of quality. Hence why it is my go to aperture.
AV Mode – giving aperture the priority
I set the aperture to F8, the ISO in this case at 400, and let the camera choose the shutter speeds. I used an ISO of 400 as I had to shoot handheld, there was too much going on to get my tripod out!
But as you can see the shutter speeds were just fine.
Why I took this photo handheld?
Well as you can see there is a lot going on, and I took this photo at the top of the stairs to the site office. On a busy construction site you sometimes have to accept that, as the photographer, it is not about you and you cannot afford to get in the way!
Processing in Lightroom only
No Photoshop required. All the processing was done in Lightroom. And it did not take me long.
I started of merging the three photos to create a new HDR File. I showed you the three RAW files earlier. Rubbish aren’t they!
The main thing to do here was to get the building nice and level and vertical. To do that I got the crane vertical, the perfect reference line slap bang in the middle of the photo.
Once I had the crane nice and straight it was an easy task to get the buildings level. As ever, it is always a question of how far do you go, it needs to look right but not 100% vertical or that will look odd – we are not used to seeing things that way.
I then did some adjustments in the basic panel, and the HSL panel, removed some dust spots, added a bit more depth to the vignette and painted some dodging onto the building.
And job done in a couple of minutes!
Taking the shot
It was a hot day in Southampton. And I was wearing site boots, high vis jacket and hard hat. And there was a lot going on. So I quickly got the shots I wanted and got out of there!
I actually took 39 photos in 15 minutes – I was after the crane and the site this time. And to not get in anyone’s way!
Related viewing
There is a You Tube video for this blog post which you can watch here on my You Tube channel.
Get a weekly email from me to you
Yep, if you want to receive an email from me every week then fill in the form on this page – there will be one somewhere. And in return I will send you a splendid Lightroom thing, and you will receive my thoughts straight to your inbox on a Friday afternoon. Which is nice.
OK – how can I find out more about this stuff?
Simple.
Get in touch with me – email me – sales@rickmcevoyphotography.co.uk
Check out my website Rick McEvoy Photography
Check out my splendid Photography Explained Podcast
Get in touch, ask me a question that I can answer on my blog or podcast, or just say hi – it would be great to hear from you.
Thanks for visiting my small but perfectly formed website, and I look forward to hearing from you.
Cheers from me Rick