I am moving into the travel photography niche more and more. And also, into micro four thirds photography.
I need to come up with what will be my micro four thirds travel kit – this will be the photography gear that I use for my travel photography work. In this post I will explain what my travel photography kit is, and how and why I have selected that particular collection of kit. Travelling light in style sounds good to me!
Yes, I know – more gear talk! Apologies for that but I am in a state of transition at the moment.
Where does travel photography fit in with my commercial work then?
Well as you might know my main specialism is architectural photography. This is my core photography business. I also love travel. And landscape photography. Put this little lot together and what do you get?
Travel photography my style. Photographing buildings and their surrounding environments in nice places.
Travel photography is the natural progression of my photography work, and the only broadening from my core business. (I still turn down photography work that is not my specialism).
What is my specialism, and what gear have I been using?
I am an architectural photographer. Architectural photography is broadened out to include anything to do with photographing buildings.
I have been using full frame Canon DSLRs and L series lenses for well over a decade now. And still am.
OK so that is the background. So why the new gear?
This is why.
Last year we were on holiday on the wonderful Greek Island of Rhodes. I took my Canon 6D and 17-40 and 70-200mm lenses. And a tripod. And all the paraphernalia that accompanies this wonderful gear.
And do you know what? I could not be bothered getting my camera out of the boot. I was fed up with all that gear. And that was when I decided that I wanted a much smaller set up for travel photography.
I found myself using my iPhone pretty much all the time, except for the sunrise shoots that I did when I had all my gear.
In fact I did not take my Canon 6D out of the room safe for the first few days, and when I did I soon got fed up filling the safe with this lump of kit. Any day that we went out I would religiously get my gear out of the safe, put it in my bag and into the boot of the car. And when we got back I would have to go back to the room to put the stuff away.
I think I have been using the same gear for so long that I have bored myself!!
Basically I was bored with my gear
And that was the start of what has ended up being my journey into micro four thirds photography.
I have written a number of posts about this on my photography blog, including
How to choose your next camera – 31 features that I want
And
Professional photographers who use micro four thirds – really?
See I have been thinking about this for some time now!
And another thing
I want a camera in the glove box of my car. Something I can just grab any time I want to take a photo of something I see.
Is there anything else I want?
One small camera body and one lens. That is the core of my travel photography set up. Well I say travel photography, my day to day photography set up. For stuff I want to do.
And it has to be able to deliver professional quality imagery. If it does not then there is no point – I might as well just stick with my iPhone.
What about my commercial photography work?
That will stay with my Canon 6D for now. I will use my new camera on commercial jobs and compare the results, but the Canon gear stays – for now. I cannot risk compromising the quality of my commercial photography work.
Back to the micro four thirds travel kit – the point of this post.
To start with – which camera body?
My first foray into micro four thirds photography was buying an Olympus OM-D EM10 Mk 2. Snappy name I know!
I am going to buy an Olympus OM-D EM5 Mk 2 soon which I like the look of very much.
But for now I am going to stick with the EM10. As I have bought it. But if I buy the EM5 before my next trip I will take that.
Here is the first photo I took with my Olympus OM-D EM10 Mark 2
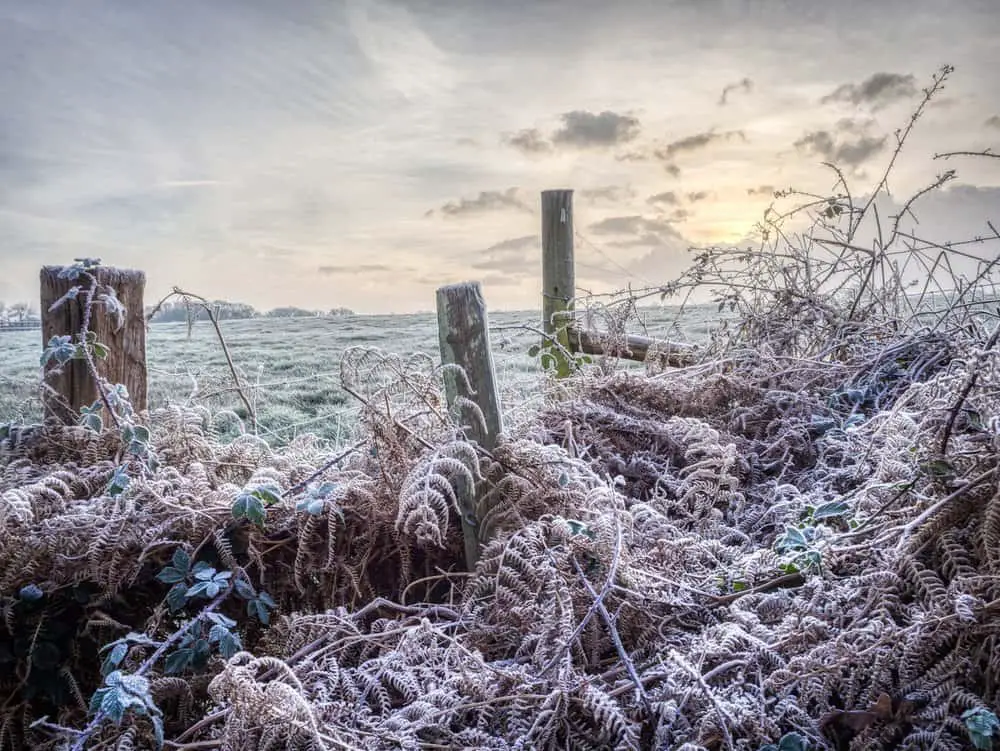
Winter scene in Dorset
That is not bad is it? By the way this image was created using Aurora HDR 2019.
And here is an architectural shoot where I trialled the camera with a Panasonic 7-14mm lens which I have returned due to excessive lens flare and purple noise. And no that is not the name of a Prince album!
The quality of the image is well as good as with the Canon! Here is one of the shots from that shoot.
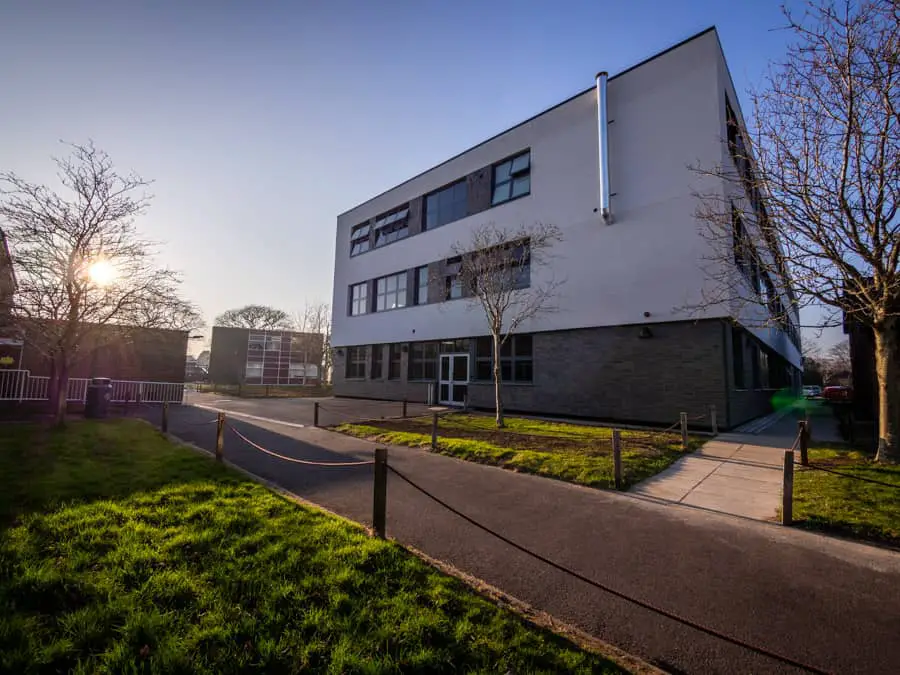
Arnewood School Refurbishment
Again, pretty impressive.
So that is the camera body sorted.
Lenses
14-42mm kit lens
The camera came with a kit lens, the Olympus 14-42mm lens. This is in effect 24-84mm lens on a full frame camera (micro four thirds sensors have a 2x crop factor).
The kit lens is OK but not to a high enough quality standard for me.
Panasonic 7-14mm lens
I tried the Panasonic 7-14mm lens and did not like it – massive lens flare problems and purple errors.
Olympus 7-14mm lens
Next for consideration was the Olympus 7-14mm lens, which I tried in Castle Cameras in Bournemouth. It was just too big. Too big for travel photography that is.
And it cost £929. So that lens is a no from me. For now. For travel photography.
Olympus 12-100mm lens
Next up on the line was the Olympus 12-100mm lens, which equates to a massive 24-200mm focal length in full frame terms.
I was advised that this lens was quite cumbersome on the EM10, and that a better option would be the Olympus 12-40mm F2.8 Pro lens.
Olympus 8mm lens
This is an interesting lens that I will consider for my architectural photography work, but not now.
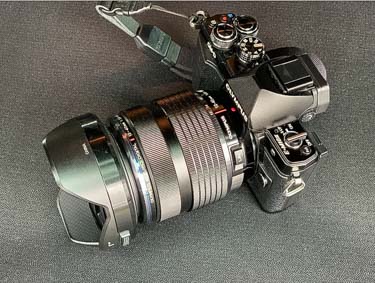
So finally I get to the Olympus 12-40mm F2.8 Pro lens
That is 24-80mm in full frame terms.
I bought one of these on EBay. Being a mainstream lens the price I got was really good for a lens in pretty much new condition.
Here it is.
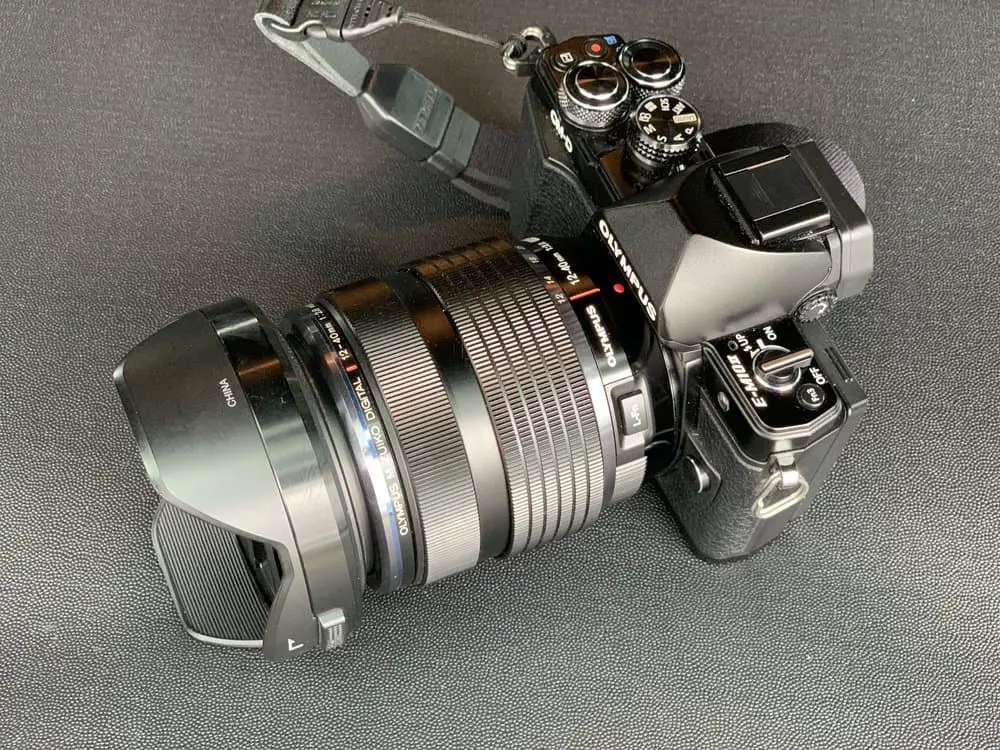
My lens of choice then is the Olympus 12-40mm F2.8 Pro lens
This lens is not as wide as I would like, but 24mm is pretty good. When I have used my Canon 6D on trips I have often paired it with the 24-105mm lens and never had a problem.
Sure is has less at the telephoto end of the scale but I sped much more time at the wide end of things so this should work nicely.
And being a Pro lens the image quality should be excellent.
That is the main lens done then. And this is the lens that will live on my camera most of the time.
Do I need another lens?
Of course I do. I am a bloke after all!
I am going to try the 12-40 Pro lens on commercial shoots and see if the quality of this combo is a match for my Canon gear. If it is I will go for the 7-14mm lens.
That leaves the other end of the scale.
Olympus do a really good, small and not that expensive telephoto zoom – the 40-150 F4-F5.6 telephoto lens.
This is not a Pro lens but is meant to give really good image quality.
I am bidding on EBay for one of these. Update – I got the lens for less that £100 and will get this in a few days.
And that will be that.
Two lenses and I am done
12-40 and 40-150mm, giving me in full frame currency 24-300mm. Sorted!
As I said the 12-40 will be on my EM10 all the time apart from when I need the telephoto length.
And the kit lens will stay in my office, only making an appearance when I need to be able to put my camera in my pocket, which I can with this tiny lens (see later for the update on this point).
Is the kit lens any good?
To be honest I do not know. I will give this lens a go and see how it compares to the 12-40mm Pro lens.
OK – lenses done – what am I going to put them in?
What is my ideal camera bag for travel photography?
Another decision to be made. I can either use the Think Tank Mirrorless Mover, my Peak Design Everyday Backpack or my Lowe Pro bag.
The merits of each as follows.
Think Tank Mirrorless Mover
It fits my micro four thirds kit nicely. I keep all this gear in this bag which I put in my car everyday.
This bag is the perfect size for the stuff I need most days. Apart from when I have my camera in the glovebox.
Hmmmm – lets not overthink this!
Peak Design Everyday Backpack
My Canon 6D and two lenses live in my Peak Design Everyday Backpack. This is fine for car-based photography. I even get my tripod in a side pocket on this bag, so that is me sorted for a good day out.
I do need space though for other stuff which I will come on to.
Lowe Pro bag
I had forgotten about this bag. The great thing about this bag is that the camera bit is on the back of the bag in the lower half, leaving the top as an empty space for non-photo stuff.
As well as what I put my gear in there is the question of hand luggage and what I need with me for a days travel photography shooting.
More on that later.
The Peak Design Everyday Backpack is my travel bag of choice
For now, I am going to reconfigure the inside of my Peak Design Everyday Backpack to take my much size reduced micro four thirds photography gear.
One reason for this is that when I was working on my website Photos of Santorini I did not have room in this bag for other essentials, namely food, drinks and a coat.
OK – decision done. I can always change to another bag later.
And if I am not happy with any of these I have lots of other bags in the garage….
Lots of other bags.
Tripods for travel photography?
No, I am not taking a tripod. Whilst this does restrict me there are things that I can do to overcome this.
That was the start of my thought process, and then I changed my mind. I want a tripod for my new set up.
Yes – I want one! And that is the brutally honest truth – I want a new tripod for my new micro four thirds camera system. A new travel tripod.
I use a Manfrotto 055 and also a Manfrotto 190 Go tripod with a variety of tripod heads. I use these for my architectural photography.
One thing that has changed is that my new Olympus camera has horizontal and vertical indication on the LCD screen – my Canon 6D only has the horizontal level. This means that I can get away with a much smaller ball head which fits in with everything else I am trying to achieve.
That is one for me to look into further.
Or maybe I will be sensible and just get a new ball head. Or use one of the ball heads I have!
Platypod
I will still take my Playtpod, as it is dead handy and takes up very little space or weight. There are some really useful accessories for my Platypod in a neat pouch that will be part of my travel photography kit.
Ball head
I need a ball head for my Platypod. Will a ball head from a new tripod fit the bill? I will have to think about that.
Manfrotto Pixi
I will include this in my kit as well. A dead handy lightweight piece of kit that I have used loads with my Canon 6D and lenses, so this will work a treat with the Olympus gear.
Accessories – other essential stuff
Cleaning solution
I use Eclipse Lens Cleaning Solution, and have no reason to change from this.
Pec Pads
These go hand in hand with the lens cleaning solution. Again no need to change – I have used these for years.
Hurricane blower
For blowing dust off the sensor and other stuff.
Passport colour checker
I have not used this that much, but am going to include this in my travel photography kit as I have it and should use it more.
Lastolite Grey card
This is a collapsible grey card. It is grey but not a card!
Batteries and charger
I have two spare batteries. I will get some more if needed – I have not used the camera enough yet to be fair so am not sure how much use I will get out of a battery.
Memory cards
I already have numerous SD cards – I will use the same ones in their dedicated case just as I do with my Canon 6D at the moment.
iPhone – wireless connectivity
Of course I will have this with me.
DJI Osmo Mobile
Not strictly speaking travel photography gear, but something that I have that I want to use more and more to enable me to produce better quality videos of the locations I am visiting.
And the other essential things
- Food
- Drinks
- Coat, hat and gloves
Whilst I go to warmer places, they are not that warm first thing in the morning. I am talking about Santorini here, which in April 2 hours before sunrise was cold and blustery.
Stuff I buy from the airport.
Yes, I need space in my travel photography bag for the stuff that I will inevitably buy at the airport and on the plane.
There are the inevitable purchases at the airport, which I normally carry in a separate plastic carrier bag which I quite frankly hate doing. If I can manage to get all this stuff in my camera bag then that alone will make this all worthwhile.
Hand luggage
If I am going away anywhere on a plane I have two bags. One is checked into the hold, the other is my carry on luggage. That is my camera bag. This is why my bag of choice will be the Peak Design Everyday Backpack. With space for non-photography stuff.
Back to my glovebox
Once I have the EM5 this is what I am going to do. I am going to put the OM10 and 14-42 kit lens in my glove box and it will live there, leaving my EM5 and 12-40mm lens in my funky little bag.
Another thing sorted!
Conclusion
This is the conclusion that I have come to – this is my micro four thirds travel kit.
The whole point of moving to micro four thirds was to take less gear – I have to keep reminding myself of this fact.
So this is the kit for my next trip.
- Olympus OM-D EM10/ EM5 Mk 2
- Olympus 12-40mm lens
- Olympus 40-150mm lens
- Tripod and ball head
- Peak Design Everyday Backpack
- Battery charger and 2 spare batteries
- 6 SD cards
- Platypod
- Manfrotto Pixi
- Travel tripod and ball head
- Cleaning stuff
- Passport colour checker
- Micro fibre cloth
- DJI Osmo Mobile
And that is it. No more.
This leaves plenty of room for other stuff like food, drinks and clothing.
And Duty Free and other shopping!
One last thing
I have a gear page on my website where you can check out all the gear using my affiliate links – you can get to this page here.
One last last thing
Here is another photo taken with my Olympus OD-D EM10

Sunshine in the New Forest by Rick McEvoy
Thanks for reading, please get in touch with any questions or comments.