
Exposure is a vital part of taking a photograph correctly. The exposure triangle is key to obtaining the correct exposure for every image.
The exposure triangle is the combination of aperture, shutter speed and ISO which determines the exposure of an image. The correct selection of these three related settings determines the correctness or otherwise of every photo taken. The exposure triangle also gives photographers choices in the selection of aperture, shutter and ISO whilst still achieving the correct exposure.
The three elements of the exposure triangle are
- Aperture
- Shutter
- ISO
No graphs, charts or complicated stuff. Just a good old fashioned plain English explanation from me to help all of us photographers take better photos.
You can also check out the accompanying video on my YouTube Channel where I talk through this subject in a bit more detail.
After reading this post you will understand the exposure triangle, the three elements of the exposure triangle and why this is important to us all as photographers.
OK – let’s do this!
1 – What is the exposure triangle?
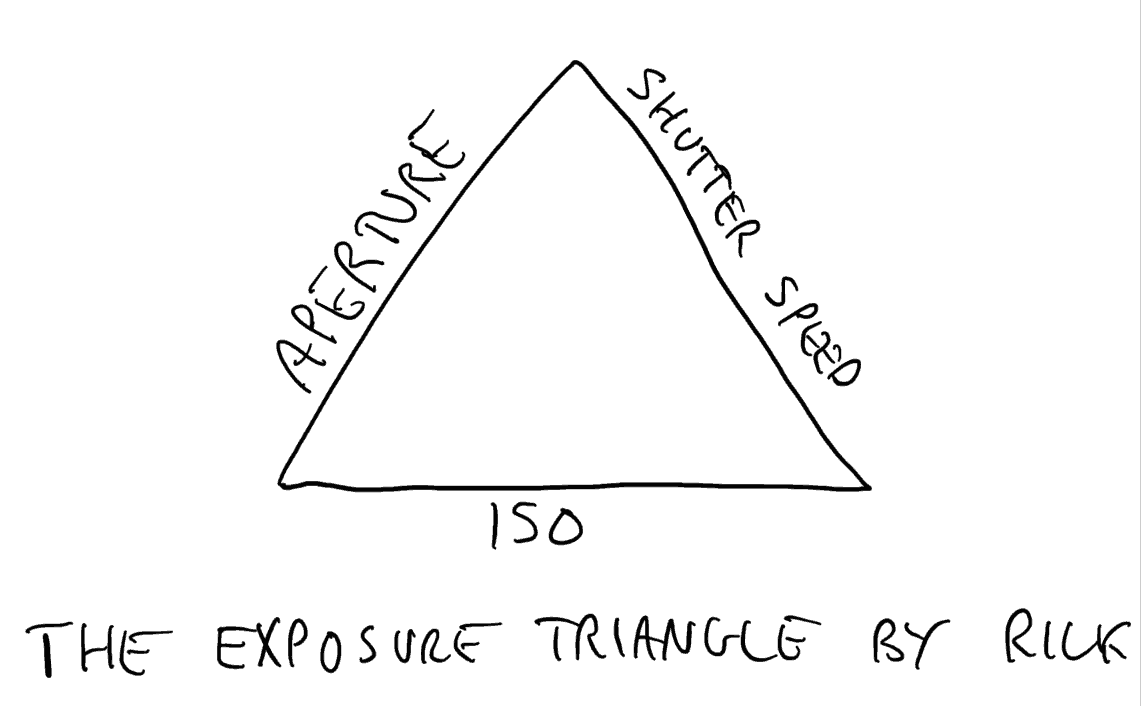
Nice drawing eh? I did that myself!
The exposure triangle is the combination of the three things, the aperture, shutter and ISO. These tell the camera sensor how to record the composition viewed through the camera lens.
2 – What is the aperture on a camera?
The aperture on a camera is a multi-bladed device that changes the size of the opening in the camera lens through which light is travelling.
I use a Canon 24-105mm F4 lens.
The aperture range is F4 – F22.
The maximum aperture is F4. At F4 the aperture is not visible, meaning that the lens is fully open, and the maximum amount of light can pass through the camera lens to the sensor.
The minimum aperture is F22. When I select F22 the aperture closes down, reducing the opening through which light travels to the sensor to its smallest size, hence the name minimum aperture.
On a DSLR the aperture closes to the selected aperture only when the shutter release button is pressed, and the image is captured.
You can on most DSLRs use what is called the depth of field preview button to manually close down the aperture. This allows you to assess the depth of field through the viewfinder by activating the selected aperture. You can also see the aperture blades doing this.
- Maximum aperture = maximum amount of light transmission to the sensor.
- Minimum aperture = minimum amount of light transmission to the sensor.
3 – What is ISO?
ISO stands for International Standards Organisation. Back in the days of film you could buy films with various ISOs. There was also ASA and DIN.
Confused? Well the International Standard for Organisations came up with their own way measuring camera film sensitivity, and this was the one that stuck.
But please don’t worry about this, as far as we are concerned the origin of the term ISO is not important.
How ISO applies in photography is however very important.
So ISO is a standardised way of measuring camera film sensitivity to light. The standard camera film had an ISO of 100. ISO 400 film was for cloudy days, and ISO 1600 for low light and sports photography. And then there was the ultra-fast ISO3200 film.
There were other ISOs, but these were the main ones, and I am quoting these to explain what ISO means.
Which is this. A camera film with an ISO of 400 is more sensitive to light than a camera film with an ISO of 100.
- The higher the ISO number, the higher the sensitivity to light.
- The lower the ISO number, the lower the sensitivity to light.
- The lower the ISO number, the higher the quality if image capture possible.
ISO is the sensitivity of camera film to light.
And moving to the current day, the ISO is the sensitivity of the camera sensor to light.
And on a digital camera the ISO can best anywhere from ISO100 to ISO25,600. This is the ISO range of my Canon 6D.
In general terms the lower the ISO the higher the quality of image capture. But that is for another post.
I am going to stick to the exposure triangle only in this post.
4 – What is the camera shutter speed?
The shutter speed is the amount of time that the camera shutter is opened to allow light to be recorded by the camera sensor.
The faster the shutter speed, the shorter the time the shutter is open meaning less light is captured by the camera sensor.
The slower the shutter speed, the longer the time the shutter is open meaning more light is captured by the camera sensor.
5 – Next I need to explain what a stop is.
If we were starting over with photography we surely would not come up with all this stuff would we?
A stop is a measurement of adjustment of light. A stop can be applied to each of the three components of the exposure triangle.
An adjustment of 1 stop equates to either a doubling or halving of the amount of light that reaches the camera sensor. I will explain stops for each of the components of the exposure triangle, and how they relate to each other.
6 – Aperture and stops explained.
My Canon 24-105mm F4 L lens has a maximum aperture of F4, and a minimum aperture of F22.
The full stops are
- F4
- F5.6
- F8
- F11
- F16
- F22
Remember, the smaller the number the larger the aperture. And going from F4 to F5.6 is reducing the aperture by 1 full stop, which is halving the amount of light reaching the sensor.
7 – ISO and stops explained
The same principles apply to ISO. Remember that the ISO is the sensitivity of a camera sensor to light.
ISO full stops are as follows
- ISO100
- ISO200
- ISO400
- ISO800
- ISO1600
- ISO3200
- ISO6400
- ISO12800
- ISO25600
Unlike the aperture scale ISO follows a more logical, linear progression.
Changing the ISO from ISO100 to ISO200 is making a change of one stop. This adjustment is doubling the sensitivity of the sensor to light.
This means that doubling the ISO only half the light is required to achieve the same exposure.
8 – Shutter speeds and full stops explained
Shutter speed is the time that the shutter is open exposing the senor to light.
Full stop shutter speeds are
- 30 seconds
- 15 seconds
- 8 seconds
- 4 seconds
- 2 seconds
- 1 second
- ½ second
- ¼ second
- 1/8thsecond
- 1/15thsecond
- 1/30thsecond
- 1/60thsecond
- 1/125thsecond
- 1/250thsecond
- 1/500thsecond
- 1/1000thsecond
- 1/2000thsecond
- 1/4000thsecond
As you can see there is again a linear progression.
If you change the shutter speed from 1/250th second to 1/500th second you have reduced the time that the shutter is exposed by one half, which is a full stop. This means that the amount of light reaching the sensor has reduced by a half.
9 – What difference does a full stop make?
A full stop adjustment either halves or doubles the amount of light reaching the camera sensor. And a full stop is the same be it ISO, aperture or shutter speed.
10 – Getting a correct exposure
The aperture, shutter speed and ISO combine to determine the brightness of an image. If everything is set correctly then the exposure will be correct. The image capture will be as close as the camera is capable of capturing in a single image of the scene being photographed.
You can find out the correct exposure using your cameras meter. Another subject for separate post.
11 – OK – how do these three relate to each other?
Let me give you an example.
The following settings are correct (according to my cameras meter) for the scene I am photographing
- Aperture F8
- Shutter Speed 1/250th second.
- ISO 400
If I were to adjust the aperture by 1 stop to F11 I would be reducing the opening size of the aperture, halving the amount of light reaching the camera sensor.
The image would be darker than the correct exposure would be. The image would be one stop under exposed.
If I took the original settings and increased the ISO to 1600, I would be increasing the sensitivity of the camera’s sensor by 2 stops, quadrupling the brightness of the image. The image would be too bright. The image would be 2 stops overexposed.
And finally if I were to change the shutter speed from 1/250th second to 1/125th second then the time that the sensor was exposed to light would have been doubled, again making the image too bright.
11 – And for completeness
Different combinations can provide the same exposure.
- Aperture F8
- Shutter Speed 1/250th second.
- ISO 400
Provides the same exposure as
- Aperture F5.6 (one stop more light)
- Shutter Speed 1/500th second (one stop less light).
- ISO 400
As does
- Aperture F5.6 (one stop more light)
- Shutter Speed 1/250th second.
- ISO 200 (one stop one stop less light)
Further reading/ viewing
In future blog posts I will be writing about aperture, shutter and ISO. You can subscribe to my weekly photography blog from my home page, and check out my other blog posts here.
There is a YouTube video which accompanies this post which you can view here – please forgive the quality but I am slowly improving!
And on my YouTube channel you will find lots of other good stuff all about photography – please subscribe so you get to see my weekly posts.
I would like to point you in the direction of a recent blog post I wrote which is proving very popular Very Quick Photography Tips – 105 Things Worth Knowing.
Talking of popular recent articles and my Canon 6D you might find this article interesting which I published recently about my favourite camera Is The Canon 6D Still Worth Buying In 2019?
Who am I?
I am a professionally qualified photographer – ABIPP – based in the south of England. I specialise in architectural, landscape and travel photography. I am a freelance writer and website creator.
Summary
The exposure triangle is the combination of aperture, shutter speed and ISO. All three relate to each other and changing each one affects the expsoure. Understanding the exposure triangle allows you to be more creative taking photos, as you can change these three settings and still get the correct exposure.
I hope that you now understand the exposure triangle, the three elements that make up the exposure triangle, what they are and how they relate to each other.
This is not a scientific or technical explanation of the exposure triangle – there are lots of those on the internet. The purpose of this post was to explain the exposure triangle in plain English, which I hope I have managed to do.
Rick McEvoy ABIPP – Photographer, writer, website creator
#exposuretriangle #exposuretriangleexplained