One of my favourite things is taking photos. I have been doing this for well over 30 years now, still love it, and have learnt a lot along the way.
Do you want to take better photos now! Here are 15 tips that are actually useful. These are practical things that you and I can do every day. The tips start with thinking about the photos that you are taking and thinking more about composition, and end with just getting out and taking more photos. And if you already have a camera and a tripod these tips will not cost you a penny/ cent.
Here are the 15 tips
- Tip Number 1 – Think about the subject matter
- Tip Number 2 – Composition is king
- Tip Number 3 – Background, middle ground, foreground
- Tip Number 4 – Learn the rules of photography
- Tip Number 5 – Check the edges
- Tip Number 6 – Watch the light
- Tip Number 7 – Timing
- Tip Number 8 – Get the exposure right
- Tip Number 9 – Choose the right aperture for the photo
- Tip Number 10 – Now pick a shutter speed
- Tip Number – 11 – The third part of the exposure triangle – ISO
- Tip Number – 12 Use a tripod
- Tip Number 13 – A word on image processing
- Tip Number 14 – Give yourself time
- Tip Number 15 – Practise, practise, practise
Sounds interesting? Great. Then let’s get stuck into these 15 tips.
Oh yes, when I say take better photos I think I should have said create better photos.

Architectural Photography by me Rick McEvoy
Who am I to advise on this stuff though?
I am Rick McEvoy ABIPP. I am a professionally qualified photographer, writer and website creator. I write about photography stuff on my photography blog.
So hi from me and thank you for joining me here. Very nice to meet you.
You will find a little more about me at the end of this post, but let’s get into those 15 tips right now.
One thing I need to tell you
Some of the links in this post are affiliate links. If you click on a link and buy something I get a small commission. You don’t pay any more, but Amazon gets a little less.
And if you do thank you.
Tip Number 1 – Think about the subject matter
- What are you taking a photo of?
- Why are you taking this photo?
- What is the intent behind the photo?
- What are you trying to capture?
- Who is the image for?
- What are you going to do with the image?

Sun and tree at sunrise on Rhodes
Now this might all sound a bit high level and artsy, but this is wholly relevant when taking a photo.
For the photo above I wanted the tree and the sun – a very deliberate composition.
I find it helps to ask these questions. It gets me more quickly to have my camera pointing where I want it to. I hate taking photos for the sake of it hoping that when I get back to my office I have a great shot in the bag!
And I had been doing that for years by the way. Many years, getting back, looking at the hundreds of photos that I have taken looking for that gem.
And do you know what – they were seldom there!
Take less photos but better photos
These days I can go out on a sunrise shoot and only take three different photos, one a before the sunrise shot, one of the sunrise itself and one after the sunrise.
OK I am not that brave, I do take more than three photos but often they are of one or two compositions. I worked on that a lot.
I choose a composition and stick with it.
Talking of which
Tip Number 2 – Composition is king
What is the single most important thing in photography? It is the photograph you create. And also what determines what is in the photo?

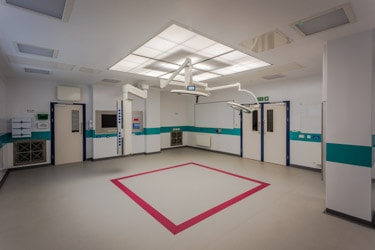
Operating Theatre, University Hospital Southampton
This composition shows enough of the operating theatre whilst at the same time excluding things that confuse the image. The central canopy with all that complicated stuff around is the subject of this photo.
The composition.
Photography is all about composition. What you include in a photo and how you include it. And also what you do not include. What you do not include is as important, sometimes more important.
As I said above on a sunrise shoot I will choose a composition for the sunrise. Sure I will take more than one photo, but they will be from the same composition. I might take 30 photos of the sunrise, recording the rising of the sun, but my composition will be fixed. These 30 photos will record the rising of the sun and give me options with the one thing that I cannot control – the light and how it is interacting with the scene.
And where the sun is in that scene. And at what point in the sunrise is the light the best.
After all, I have got up at stupid’o’clock in the morning so it would be stupid to not capture the whote, wonderful dawning of a new day.
See I really do like this stuff!!!
But whilst there might be 30 photos taken there is still one composition.
When I am photographing a sunrise I will decide what my composition will be and that is that. I will take a test shot to make sure I am happy with my composition and change it if I am not.
And of course if a boat appears I have to get that in!

Photo of sunrise in Gaios on the Greek Island of Paxos
For this photo of the sunrise in Gaios, Paxos, I took a sequence of about 30 photos, but chose this one with the sun just above the mainland of Greece. And the boat. You can find out more about Paxos on my website Paxos Travel Guide.
My aim is to get the best composition I can, and if I get one shot from a shoot that is worthy of going in my portfolio I am happy.
One sunrise, one composition, one shot. That is all I aim for.
I take photos before and after as there is still great light to be had, but as I said sometimes there will be just three separate images.
And for my architectural photography work?

Interior photography by Rick McEvoy
On an architectural shoot I often only get one chance for each shot. I know that I will probably be shooting at 17mm for interior shots and know what I want to include in a scene, from not only the client brief but also my experience and knowledge of what works and what does not work.
Once I have assessed a scene and worked out what I want to photograph I place my camera on a tripod where I think I will get the best shot.
How I compose an architectural photography shot
I use both the live view LCD screen and the optical viewfinder to come up with my composition, going from one to the other until I am happy.
I take time doing this and will check the first couple of images to make sure I am nailing the shots. Once I am in the groove I don’t bother checking the image captures to be honest – I know that they will be ok.
I only took one photo of the shot above. Only one was needed – everything was where I wanted it.
Less is more
I judge the success of an architectural shoot by checking how many images I took against how many I issue to the client.
My aim is 20 photos, 20 client shots – 100% success rate with composition and everything else.
Take your time with the composition – I have never got back from a shoot wishing I had spent less time getting the bestcompositions!
Composition is king and should be treated accordingly.
Sorry one more thing. The first thing that us humans tend to see in a photo is the brightest thing in the photo – this is worth remembering all the way through the image capture process, composition, image capture and post-processing.
Tip Number 3 – Background, middle ground, foreground

Photos of Santorini by Rick McEvoy
These are three elements that, if used thoughtfully, can add depth to an image and make it more compelling.
Whilst you might think that I am talking here about the components of an image, which of course I am, there is also another thing to consider.
The rocks above are the foreground interest. They are illuminated by the rising sun but the ground behind is not yet. But the background caldera is.
The depth of the light.
Yes there is nothing better than lovely gradations in the light from front to rear adding further depth to an image.
And remember the point I made above – we tend to notice the brightest part of an image first, so think about that with the light.
Back to the three physical elements in a photo
- Background
- Mid-ground
- Foreground
The convention is to have a foreground element, the main subject in the mid-ground and a complimentary background.
Nothing wrong with that but always make sure that these three elements are correctly arranged to complement each other and naturally give depth to the composition. If you can arrange these elements within your photo you can lead the eye where you want to within the image.
Get this wrong and people can find themselves looking all over the place, or more likely moving on quickly to the next image in the online feed they are looking at.
Check the background.
Much time can be saved in Photoshop by a quick check of the background and a quick change of composition at the time of taking the photo.
When people say get it right in camera they are of course correct.
If I can come up with a composition meaning that there is no need for me to go to Photoshop then I am very happy – I only use Photoshop to remove things.
So if I go into Photoshop I have captured something I did not want in the scene. Sure this sometimes cannot be avoided but I try to minimise the post-processing required.
Photography for me is about taking photos, not making photos after on my computer.
Tip Number 4 – Learn the rules of photography
There are many rules of photography.

Photos of Santorini by Rick McEvoy
The rule of thirds
My favourite is the rule of thirds. Once I have taken a photo using the rule of thirds I might take another photo breaking the same rule to see what I get. Not every shot but the ones where there are possibilities.
The composition above benefits from the rule of thirds nicely.
I need consistency of composition as well as image capture and processing, which I will talk about later.
I use the rule of thirds a lot as it works for architectural photography – it puts the elements into a logical and structured place within an image, which helps my clients as they get sets of images that are consistent and fit together.
Learn the rules then break them
For my personal work I will use the rules then break them as much as I can to see what I can come up with.
There is a lot of snobbery about the rules of photography and why you should not follow them.
This is what I say.
There is nothing wrong with the rules of photography, they have evolved over the years and have been instrumental in the creation of many wonderful photos.
Rick McEvoy
And the same can be said of not following the rules of photography.
So learn the rules of photography, practise them, bring them intuitively into your workflow.
And then consciously break them.
Photography is meant to be creative!
Most importantly, do what you want to do. As long as you think about what you are doing and learn from what you have done it is up to you.
Don’t be afraid of the big bad rules of photography! Nor anyone who tells you that you should be.
Be creative.
Tip Number 5 – Check the edges
I mentioned checking the background in the composition.
I want to specifically add this point to that – check the edges when you take a photo.
Don’t rely on Photoshop for this.
Get rid of distractions
Are there any distractions around the edges of the composition? Things appearing on the edge that detract from the image?
If there are things that I will have to remove in Photoshop I will try to eliminate them by slightly changing my composition.
Things like
- Bits of trees
- Aerials
- Bright leaves on the front edges
- Power lines
- Telegraph poles
- Pylons
- Anything bright that draws the eye
You get the idea.
But this is not always possible. So check before you take a photo, and check after when you are finishing off your processing.
What do I use Photoshop for?
I only use Photoshop to remove stuff I do not want in images, and I always check the edges as part of the process.
I mentioned this earlier, but it is worth repeating – we are trying to get people to look into the photo. If there are distractions on the edges they will negatively impact on the viewing experience.
Yes I said viewing experience!
Tip Number 6 – Watch the light

Lovely diffused light through the trees at The Vyne in Hampshire, England
- What is the light doing?
- What direction is the light coming from?
- Where is the sun?
- How does the light interact with the subject?
- Do you need to add light, or indeed remove light from a scene?
Light is what we are recording, so look at it, study it and understand how it adds to the composition.
What is photography if not drawing with light?
Photography is drawing with light. Literally. Light is the thing that can make a photo, or indeed break a photo. Check out my post What Is Photography for more on this.
Now I know that the light is the best before, during and after sunrise. That wonderful directional light giving depth, warmth and vibrance to images.
The reality of being a working photographer
The reality is that when I am working on an architectural photography shoot I do not have the luxury of magnificent sunrise/ sunset light. I tend to get the stuff between 10am and 4pm, which is not the best light.
But that is what I have to work with, and what I have to get the best out of.
And let’s not forget the first thing a person sees in a photo is the brightest part – make sure that the brightest element is the one that you want to be the most prominent and seen first.
Tip Number 7 – Timing
This follows on nicely from the point above.

Durdle Door and a spectacular sunset on the Jurassic Coast
Work out when the best time is to take a photo of a particular scene. For a sunrise and sunset this will be a known time. But do not forget the time before and after these events.
If I am going to photograph a sunrise I will always try to be there at least an hour before actual sunrise. The light before sunrise can be spectacular.
And I stay a good hour after.
And of course I do the same with sunsets.
How do I know when the sun will rise/ set?
Check what the light is doing, and when. I use the Photographers Ephemeris to do this – it is a great app that gives me lines on a map showing all the relevant events of a day.
And yes I paid for it!
Timing and architectural photography shoots
On architectural shoots I will ask my client to send me a plan of the building being photographed with a north arrow on it so I can work out when is the best time of day to photograph each part of the building, both internasl and externals.
I have never had a client agree (to pay me extra) to me photograph a building at sunrise. I have managed to get the odd sunset shot when things ran on a bit though.
Tip Number 8 – Get the exposure right
Exposure has to be nailed. There really is no excuse to not do.
How do I do this?
Well the purists will tell me that my technique should not be promoted, that I am not doing things how they should be done.
I take three photos. I auto-bracket my image capture.
I take three images
- The correct exposure
- Two stops under exposed
- Two stops over exposed
I merge these images together in Lightroom later.
I am capturing more data – more of the highlights and more of the shadows. This gives me more to work with later, and also to be honest gives me a margin for error!
This is called HDR photography.
And there is nothing wrong with this technique in my opinion – I am using the technology available to get the maximum data in a scene that I can.
Why do I do this?
At the start of a shoot I set up my camera so the only things I need to think about are
- Composition
- Focus
Apart from that I do not give my camera settings a second thought. Everything else stays as it is.
This leaves me to concentrate on taking photos. For my commercial work I only have one chance to get each photo – once I have left a site there is no opportunity to return.
So I have to cover all the angles, and not worry about camera settings.
It works for me.
Check out my blog post explaining the exposure triangle for more info on this subject – The exposure triangle explained in plain English.
If you are taking a single exposure you need to ensure that you capture all the shadows and all the highlights without losing any data.
The way to do this is to expose as brightly as you can so you get all the highlights without losing any of them – this is called exposing to the right.
Or do what I do which works just fine!
Tip Number 9 – Choose the right aperture for the photo
Choose the correct aperture for the image. I typically use F8 for exterior architectural photography shots, and typically F16 for interior shots. I only vary from these when there is a specific need to.
For travel photography I tend to stick with the same, using a maximum aperture if I want to blur the background, and using F22 when I am shooting straight into the sun for that starburst effect.
What does the aperture do?
The aperture determines the sharpness of the image and what is and what is not in focus. Use the maximum aperture and you will have less in focus in a shot, use the minimum aperture and you will have more of the scene in focus.
The point is to choose the aperture for each and every shot – simple.
Well I say simple, it also helps to find out what the optimum aperture is for each lens that you own. Each lens has its own quirks and characteristics. The rule of thumb here is that the sharpest aperture, also known as the sweet spot of a lens, is 2 -3 stops from the widest aperture. So on my Olympus 12-40mm F2.8 lens this is F5.6 – F8, and for my Canon 17-40 F4 L lens this is F8 – F11.
So F8 then!!
Tip Number 10 – Now pick a shutter speed
For most of my photography work the shutter speed is irrelevant. This is why I shoot in AV mode.
When is shutter speed important to me?
When I am photographing moving water.
When I am shooting externally and the wind is moving clouds, trees, vegetation etc.
Apart from that I do not need to worry about the shutter speed too much, but you might depending on what you are photographing.
Shutter speed and hand held photography
A couple of points here – if you are shooting handheld, the shutter speed should be faster than the reciprocal of the focal length.
What?
Putting it another way, if you are taking a photo at 200mm you should have a shutter speed selected which is faster than 1/200th second, aka 1/250th second.
If you are using a focal length of 50mm then you should have a shutter speed selected which is faster than 1/50th second, aka 1/60th second.
I am sure you get the point.
The right shutter speed for the photo
Choose the shutter speed for the photo you are creating. Fast enough to freeze things, and slow enough to allow movement to blur – it just depends what you are trying to do.
Get creative with your shutter speed and see what results you get – photography is all about being creative and trying new things.
Change the shutter speed with an ND filter
Sorry this might cost you money.
If you have never tried this get a neutral density filter. A neutral density filter lets you use a slower shutter speed by reducing the amount of light that passes through the camera lens onto the sensor.
A 1 stop ND filter reduces the shutter speed by 1 stop – it 1/60th second is reduced to 1/30th second.
A 2 stop ND filter will take the shutter speed down to 1/15th second.
And this is how it goes on.
- 3 stops – 1/8th second
- 4 stops – ¼ second
- 5 stops – ½ second
- 6 stops – 1 second
- 7 stops – 2 seconds
- 8 stops – 4 seconds
- 9 stops – 8 seconds
- 10 stops – 16 seconds
So in broad daylight you can take a photo with a shutter speed of 16 seconds using a 10 stop ND filter.
I do this and love it.

Jetty, Nissaki Beach, Corfu Greece
If you are experimenting don’t spend a lot on an ND filter – get a cheap one and give it a try and see if you like it.
I have a Lee Big Stopper 10 Stop ND filter by the way. It is not cheap.
Tip Number – 11 – The third part of the exposure triangle – ISO
In general terms the lower the ISO the higher the quality of image capture. I use ISO 100 most of the time, only changing it when I need to.
But remember this – choose the ISO that will allow you to get a sharp image capture. Higher ISOs introduce the chance of more noise.
The general public do not know what noise is though. But they do know what a blurry photo is.
Given the choice go for tack sharp and take noise as a necessary evil of getting the tack sharp image.
Or use a tripod.
Talking of which.
Tip Number – 12 Use a tripod
It might sound a bit odd but when I use a tripod I take better photos.

Taking a photo from Skaros Rock on the Greek Island of Santorini
On an architectural shoot I will only take photos hand-held when I cannot physically take a photo using my tripod due to space constraints, which are normally me having to get as far back into a corner as I can to get the composition I want. That or I am hanging over a scaffold handrail, on a roof or being suspended from a crane!
The other time is when I need a very high or very low viewpoint. High means holding my camera above my head or stuck on the end of my painters’ pole. Low means on the floor, using either my Platypod or Manfrotto Pixi tripod.
The deliberate act of composing using a tripod makes my compositions more considered.
What tripod do I use?
I was using a rather big tripod and head combo – the Manfrotto 055 tripod and Manfrotto 229 head. Now this head is a lump and a half alright, but gives me a very solid base for my Canon 6D.
I have gone back to my lightweight tripod – the Manfrotto 190 Go with XPRO geared head.
I use this on architectural work and for travel photography.
And for travel photography?
Well I did until I got the wonderful Olympus EM5, which is smaller than my Canon 6D and is combined with the excellent Three Legged Thing Corey Tripod.
Even smaller and even lighter. And with no loss of image quality.
Obviously there are times when a tripod is not appropriate but my default these days is to use my tripod.
I use ball heads and geared heads depending on where I am and what I am photographing.
And my compositions have improved since I made this change.
And I use a tripod to do all the recordings on my YouTube Channel, with a £5 phone holder screwed into the ball head.
Tip Number 13 – A word on image processing
Processing of digital images is of course subject all of it’s own.
Here I am going to talk about quickly my architectural photography work and my travel photography and landscape work.
There are some similarities in these two different workflows, but different needs and priorities.
Architectural photography processing
For my commercial architectural work there are things that are critical to me
Technical correctness of
- Horizontals
- Verticals
- Colours
- Textures
- Shapes
I have to reproduce these accurately. This makes this photographic work technically challenging, especially when I am photographing in mixed light.

University of Southampton Building B1 Refurbishment
The starting point is technical correctness – only once this is achieved can I look at the more creative side of things from this very firm base.
Processing of my architectural photography images has to also be consistent – I do multiple shoots for clients on different locations, in different conditions on different days.
They all have to look similar, have that same look and feel. I can do this.
Landscape and travel photography processing
For my landscape and travel photography I start with technical correctness but allow myself more freedom on the creative side of image processing.

Kirkstone Pass, Cumbria, England viewed from the hills above as the sun sets
I only process images in Lightroom, using Photoshop to remove bits that I do not want in images.
But for every image I create it has to look natural. Every image.
Tip Number 14 – Give yourself time
Allow yourself the time you need to get the images you want. I used to stop and take a photo quickly and then carry on where I was going.
I was always disappointed with the results.
I still do this but the act of having to get my tripod out makes me stop and think. The very fact that I have to get my tripod out has stopped from taking images of subjects which were not that great as it turns out. If I see something that I have to photograph I will take the time.
More than that I will make the time.
And if I can’t make the time to take the photo properly I will take a photo with my iPhone, so I have the location recorded and make a note of the location for another time.
Tip Number 15 – Practise, practise, practise
My number one tip for taking better photos is to practise!
The more you practise the better your photos will get.
I am still practising and improving after over 30 years of doing this stuff!
Summary
I hope that you have found these 15 practical tips helpful, which I use on a daily basis to help me to take the best photos that I can. There is an accompanying video to this post which you can view on my You Tube channel.
And that is what photography is all about – taking the best photos that we can. Thanks for reading this, and before I go
A bit more about me
I am a photographer based in lovely Dorset on the south coast of England. I specialise in architectural, landscape and travel photography.

Me on location in Santorini
I have two other websites which you might find of interest.
And I also have my own YouTube Channel
And finally I am on Pinterest
Finally finally, if you have enjoyed this post please subscribe to my blog by filling in the box on my home page.
Rick McEvoy ABIPP – Photographer, writer, website creator
#takebetterphotos #takebetterphotosnow