If you are into architectural photography then you might want to know this. I know that I do!
A good architecture photo
- Shows a building to its best
- Gives the building prominence in the photo
- Shows the best parts of a building
- Does not show unfinished/ back of house parts of the building
- Is interesting
- Is well composed
- Is correctly exposed
- Is tack sharp with the correct amount of depth of field
- Has the correct amount of detail in the shadows
- Has true verticals and horizontals
- Is processed correctly
- Looks like the building looks
OK – that is what I think makes a good architecture photo – now let me justify this.
Who am I?
I am Rick McEvoy MCIOB, ABIPP, an architectural and construction photographer based in the UK. I am professionally qualified in photography and construction – this is what I do, and this is what I write about.
I break this stuff down into easy to understand, plain English explanations without the irrelevant details.
My own thoughts and words
This is what I think, and these are my own thoughts, words and opinions. This is not me writing a blog post based on Google research. This post is based on my years of experience in both construction and photography.
So you are in safe hands here with me ok?
I will continue then.
OK – lets look at these 11 things one by one. By the end of this post you will know what makes a good architecture photo.
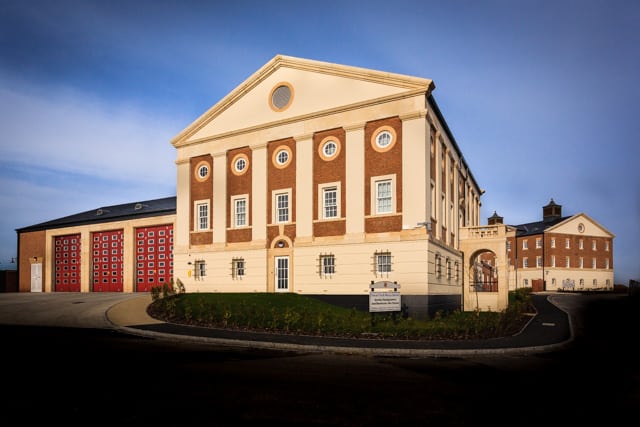
This is one of my photos, and is an example I will refer to in this post. The photo is of the newly constructed Dorchester Fire Station and DFRS HQ Building in Poundbury, Dorset, England.
1 Shows a building to its best
Now this might sound obvious but you should start off with the intention of showing a building to it’s best with every photo that you take. This is the thought in my mind on every shoot, not only that one headline photo, the money shot (if you like), the one photo. No every photo should show the building to its best.
These photos are a combination of a lot of things, starting with great composition and light.
To show a building at its best you have to have that intent and this thought in your mind before you take a photo.
OK – let’s move on.
2 Gives the building prominence in the photo
This again starts with the composition. Look at the photo above. The main features of the development are all there in one photo, and the subject matter, the important sub bits, are the brightest part of the photo.
You might no know this but the human eye is naturally drawn to the brightest part of a photo.
The low viewpoint also gives the buildings prominence – this was helped by the level of the road to the new building which helped this happen naturally.
When you look at this photo the eye is bound by the dark foreground, taking the eye naturally to the brightest part which is the stone façade of the fire station front elevation. To the left is the appliance bay, and to the right the HQ building, which are logical features to either side.
3 Shows the best parts of a building
The best parts in this case are the magnificent new stone facades with brick panels and feature windows.
This is classical architecture, and typical of the architecture of Poundbury, which is a fascinating development on the outskirts of Dorchester.
A big part of this building is the fire station, so the appliance bay doors have been included as an integral part of the story of this development.
4 Does not show unfinished/ back of house parts of the building
This is often a problem with architectural photography. In this photo for example there is a reason that the road is so dark – it was not finished. At the time I took the photo the road was a scarred mess of road base. It looked horrendous.
Rather than replacing the tarmac, a job in its own right, I cloned out the worst bits in Photoshop then darkened this section.
Unfinished works are a problem that I frequently encounter. But they are a problem that I have to contend with.
Clever composition can get round this problem removing the offending things that are not of internet such as skips, bags of rubbish, unfinished tarmac. Anything.
And no one wants to see photos of the back of house stuff, fire escapes, bit stores etc. Sure they might need photographing for record purposes, but they need to be excluded from any main images as all they do is detract.
5 Is interesting
A good architecture photo is interesting. If it is boring is not a good photo. So think about that in every stage of the process.
6 Is well composed
As well as being interesting a good architecture photo is well composed, aesthetically pleasing. Take this photo again. The composition for this photo was a challenge, due to the sheer size of the development.
What you do not know is that there is another building to the left, out of shot. A training building. I excluded this as it was an element too many. I wanted the sign in the foreground to be readable, and take you into the photo.
As I said before the use of light and dark keeps the eye in the middle where the photo is.
The sky gives natural space around the image, with the foreground so dark your eye is drawn to the lighter façade above.
This is a considered composition that works really well, in my opinion, even if I do say so myself!
7 Is correctly exposed
This is a given for an architecture photographer. The exposure has to be bang on. And this is not as easy as it looks.
So this is what I do.
I take three photos, one the correct exposure, one two stops overexposed and one two stops underexposed. I merge the three images together in Lightroom. This is called bracketing.
Why do I do this?
Cameras are not as good as the human eye. My Canon 6D cannot capture what I can see in a single image. So the three images give me more data in the lights and the darks.
And they also give me latitude when it comes to getting the exposure correct – this helps me on a shoot as it is one thing less to worry about.
8 Is tack sharp with the correct amount of depth of field
All of the subject needs to be tack sharp – to achieve this you need to get the focus point and aperture correct for the focal length of lens you are using. And you can creatively blur other bits to make the subject matter stand out more.
For architectural photography you are normally able to use a small aperture, providing a larger depth of field. Things are not moving, and you can use a tripod, so the aperture is the primary selection.
In this photo everything is sharp – I focussed on the sign, and the F11 aperture with a 22mm focal length ensured that everything in the background was sharp.
9 Has the correct amount of detail in the shadows
You can easily lose data in the shadows – I explained this earlier in the bit about the exposure.
By underexposing one of the three images I can pull data out of the shadows that would be lost in a single image capture. This is how I get additional detail in shadows, giving my images extra depth, content and interest (without digital noise).
And this applies just as equally, if not more, to interior photos, where there can be an even larger range of lights and darks to capture – think about looking through a window on a bright sunny day!
10 Has true verticals and horizontals
A building needs to be vertical, and horizontal. This is a common mistake that I see in architectural photography, which is easily corrected. There is nothing worse than a building that looks like it is falling over, unless it is a tower in Pisa that is!
And no architect/ client would thank you for this either.
More to the point, rather than correcting this in Lightroom/ Photoshop spend the time to get it right in camera. Once I have a composition that I think might make a decent photo, the next thing that I do is level my camera. I do this in stages, first by getting the tripod head level using the bubble level on the tripod head.
And then I use the funky thing in my Canon 6D to get my camera exactly level. Finally, I get the verticals correct by eye using the viewfinder and LCD screen and guide lines.
Top Tip
I take photos with the building vertically perfect, but in Lightroom I often give back a bit of tilt, say 5%, which makes the photo look more natural.
Try it and see how it works for you.
11 Is processed correctly
Here I am talking about technically and visually. The building needs to be accurately represented, with the right colours, lights, darks, textures, detail.
A good architecture photo does not shout out “hey look what I created in Photoshop!”. No it quietly, accurately and faithfully tells the story of the building.
Image capture often, in architectural photography, ends up with a lot of work in Photoshop removing things that you could not exclude at the time that will detract from the final image. That is the joy of construction!
12 Looks like the building looks
This is the follow on from the last point, and takes us back to the very beginning of this post. In a good architecture photo the building in the photo looks like the building does in real life, not like some HDR/ Grunge/ Photoshop digital nightmare.
Processing is subtle, and the photo shows the building at it’s best.
And with that closing of the circle I am done.
Further reading
Check out my website and the Work With Me page and my Construction Photographer web pages, which will give you access to more related blog posts and other good stuff.
And there are lots more related posts on my photography blog.
Related viewing
I have recorded a video of this very blog post, which you can watch right here on my You Tube channel.
And let’s not forget my splendid podcast
Yes I have my own podcast, the Photography Explained Podcast, available on all major podcast providers services. And my podcast has it’s own website, the Photography Explained Podcast website.
I don’t know how I come up with this stuff!
That’s all folks
Thanks for reading this post which I hope you found interesting and informative.
Next week on my blog
Sorry. Forgot. I have been neglecting to do this – more related reading coming up in How Do You Shoot Architectural Photography? (21 things to think about).
Any questions get in touch via my website. It would be great to hear from you.
Cheers from me Rick